
In: Category Blog Title
Planning Your Restoration
21st February 2022
In this blog post I will discuss the start of the restoration, creating a plan of action for the work that needs to be carried out to get your pride and joy back to the standard you desire.
You might have already decided to hire a professional to do the work for you or you may have the time and skills on your side to restore the vehicle back to its former glory yourself. Either way I hope this article helps you in some way to create a realistic plan of action.
You have bought a bus or coach for restoration, it is safely stored, you have a realistic budget set for the project, but now the mammoth reality of all the work that has to be done is starting to set in. Maybe some of these phrases have gone through your mind “What have I done” “What did I get myself into” “Where do I start” “Someone help” “Never going to make it to that rally”. I have heard all of the above over the years and it is no surprise that some of you are deterred from becoming preservationists due to what can be a sometimes overwhelming responsibility of keeping a vehicle on the road and in tip top show stopping rally condition.
“A goal without a plan is just a wish.” ― Antoine de Saint-Exupéry
So where do you start and what should you be looking out for?
Get a notepad and pen or if you are tech savvy use the notes app on your phone and start off by looking around the exterior of vehicle and write down virtually everything you can see that needs replacing or restoring as much as possible.
Look at the exterior panels for dents and corrosion, bent, buckled or uneven beading. Dried and cracked window rubbers, run your finger along the rubber and if it leaves a black mark on your finger this is a tell tale sign that the window rubbers are rotten. Look for corroded headlights and any rusting or peeling on the inside of the reflective lense. Are there any missing or smashed light lenses and surrounds. Check not necessarily just tyre tread depths but aging and condition, there may well be cracks in the tyre wall. What is the paintwork like? If the paintwork is dull, bubbling, rawky or flaking then it might be an idea to have the bus repainted, either brush painted or spray dependant on authenticity. My wife Kirstin always says you should be able to do your make-up in the reflection of your paintwork…or I say if you have a watch on you should be able to tell the time. Check for missing windows, safety glass if relative to the vehicle and more common I have found on newer vehicles check for scratched windows. On rear engine buses engine doors can over time get battered, corroded and patched, check to see if this will need a complete new door or panels replacing. Check for further corrosion where the engine door is hung. You might want to check your vehicle has the appropriate destination blinds as they could have been replaced over time. If there aren’t any destination blinds with the vehicle may want to source some authentic blinds or have the appropriate blinds reproduced. Obviously you haven’t got x-ray vision to see behind areas covered up so expect to see some form of hidden deterioration if any under panels, more on this in a future article.
Exploring the interior
Once you have written down all of the work that needs doing on the exterior, do the same with the interior. Check the ceiling for dents and beading hanging down and general paint deterioration. Check interior lighting see if it works, do the light holders have any signs of corrosion. If you can get to see any wiring check this for condition. Interior side panels come in many different forms such as painted, Formica, moquete and Rexene. Check these panels for damage, deteriation, rips, graffiti or missing. Look for missing or damaged interior trim. Check the floor lino for areas where the lino has come up and in particular areas where water has got in and the floor could be rotten. If floor tread has lifted this is a good sign that plywood underneath is rotting. Have a look at the interior layout of the vehicle, has it been converted to an office or theatre vehicle and therefore need the layout reorganising back to how it was in service? Have a look at the condition of the seat frames. Are there any missing or broken frames on stress points usually at the bottom of the seat back area or corrosion on the legs. Check for missing, torn or rotten seat cushions. Check handrails for broken and corroded bases, tarnished chrome, peeling coatings and any missing. Will you need to have any bright work revived, woodwork replaced and or re-varnishing? What about interior adverts, are they missing, damaged or do you have something in mind that you would like on display? When looking for legal lettering on the vehicle, you may need to do some research to make sure that any lettering displayed is actually correct to the era you require the vehicle to be restored to.
Next, it is always a good idea to take lots of photographs of your vehicle especially the little details such as legal lettering in its current state for your reference. Do this before you eagerly get started removing anything or you may regret not having photographic references later on.
But what about the mechanicals
If you are mechanically minded take a look over the mechanicals of the vehicle and check what is or isn’t working. Does the engine run well or does not at all?
If you managed to start your vehicle and it is running sweet, then carry out other checks, does it build air up or vacuum easily. If so are there any leaks. Do the brakes work? Depending on how long the vehicle has been laid up and where it has been stored can ultimately decide the condition its going to be in. It could have seized brake shoes or clutch or everything could work. You might select a gear and be amazed that the vehicle will actually move.
Some areas on the chassis to look for, outriggers for corrosion or areas where water and dirt can build up. Above air bag mounts, or look for places that become under stress in particular on the rear engine vehicles where the engine is mounted on a steel gantry.
Creating a realistic action plan
Now you have a list of all of the work that needs to be completed, this is both an exciting and overwhelming time. You probably want to jump right in and get started but take a step back and start to look at the big picture. You need to create a plan of action and stick to it.
Step 1 – What is your end goal?
When writing out the list of jobs to do you will have had your end goal for your bus or coach in mind. What kind of quality restoration do you want? Is it just going to be a runner or a perfect authentic original? Be clear about what you want to achieve and go for it, the process and end result is always both enjoyable and rewarding.
Step 2 – Money Management
Have a look at your budget verses the realistic costs of everything on your list. Do some research and find out if possible or get rough estimates from professionals of how much everything is going to be and write the costs associated next to each item on your list. Do you think the budget you originally set will cover everything? Or will the restoration need to be spread out over a number of years if all of the funding needed to do everything isn’t immediately available. If this is the case then you will need to prioritise the tasks in order of affordability and importance over a longer time period. The priorities will differ from owner to owner and vehicle to vehicle, so I will leave that bit up to you.
Step 3 – Time Management
Think about what time you have available to work on your vehicle, will it be hours or days that you can commit to working on your pride and joy each month. Will there be any volunteers or professionals working on the vehicle with you? If yes you may want to speak to them first about when they are available and gain a rough idea of how long it will take them to do the work. This will help you work out what is achievable each month. Make goals and try and stick to them when possible. If for whatever reason your plan doesn’t always work out each month don’t be disheartened, sometimes jobs take longer than expected or waiting for parts to be manufactured or sourced can throw off the schedule.
Step 4 – Final Tips
When putting your plan together you will need to prioritise each job, this will depend of course on what work there is to do.
A large restoration needs to be well thought out, you don’t want to be removing every part and piece of the bus or coach as before you know it you will end up with boxes of many bits and unless you are really organised you probably won’t remember where they all go months later. Take some time to decide how you’re going to approach this restoration methodically. Work gradually on sections at a time, for example you can start restoring body work whilst removing mechanicals as these can take time to overhaul or source the parts.
Don’t forget to always check to see if original items can be replaced before removing or damaging body or mechanical parts. For example checker plate aluminium can prove hard to source the right patterns, so careful sanding and polishing up this can be saved to look like new again. Make sure to check any wiring behind the ceiling panels and light fittings inside, depending on how old the vehicle is these may need replacing before applying interior paintwork etc.
If items are to be reproduced you will need to show the supplier as much of the original part as you can rescue and remember to take lots of photographs and measurements.
For large restorations I quite often start work on the mechanicals and exterior as a priority first, and then restore the interior last.

Making it to the Rally – 167
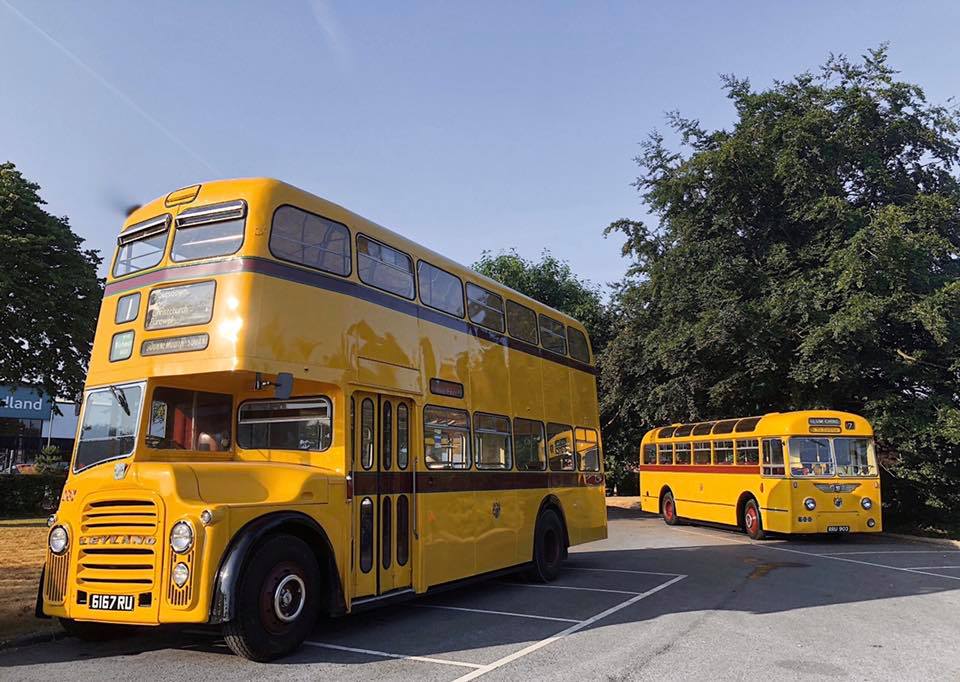
167, Bournemouth Corporation Leyland PD3 6167 RU I restored for Bournemouth bus preservationist Jonathan Hawkins mentioned in my last article. Jonathan had a deadline for the bus to be ready for his debut rally organised by himself and others in Bournemouth this year. The bus was already running and MOT’d so no major mechanical work needed to be done. I restored the exterior first which included some repaneling, preparing the panels for paint and finishing the exterior with a deep mirror finish traditional brush paint. I have also restored parts of the interior that Jonathan wanted reviving, including the floor. As you can see in the photographs, 167 certainly is a showstopper and has since been to lots of other rallies this year. Jonathan is very proud of the bus and to him it has all been worth it to see the bus restored back to it’s former glory.
Related Posts
The Bright Side
27th February 2022
Ashley Blackman takes a closer look at how restoring bright work and glazing on your bus or coach can transform the look…
It’s Electrifying
14th December 2022
In this article I interview my friend and electrical guru Malcolm Green, discuss bus and coach electrical restoration...
Get The Body Of Your Dreams
19th February 2022
The bodywork of your bus or coach is hugely important for not only the esthetics of your vehicle but also the safety…
A lick of Paint
27th February 2022
Having your bus or coach freshly painted transforms the entire look of your vehicle, especially if it is currently…